> ## Documentation Index
> Fetch the complete documentation index at: https://docs.fastgen.com/llms.txt
> Use this file to discover all available pages before exploring further.
# Single file upload
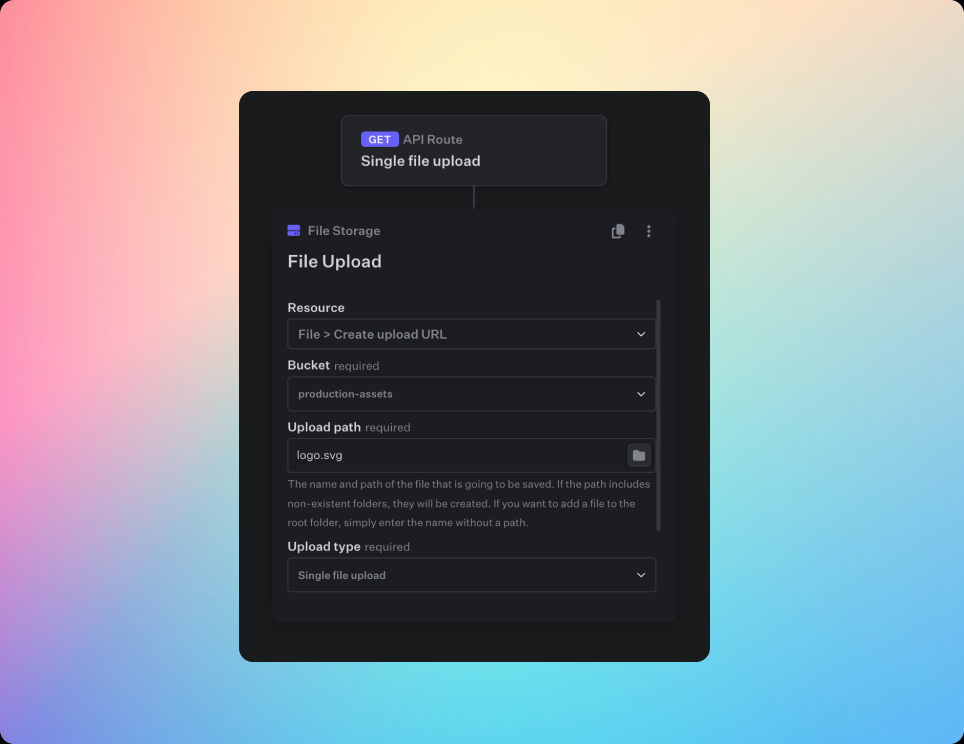 ## Uploading programmatically
### Create Presigned URL
In order to upload a file programmatically, you need to have a presigned URL. A presigned URL is a URL that grants temporary access to a specific resource in a storage service, allowing users to upload or download a file without needing direct access to the service's credentials.
You can create a presigned using the [File Storage Action](/actions/native-action/file-storage) via the [Upload Url](/actions/native-action/file-storage#upload-url).
The `Upload type` needs to be set to `Single file upload`, otherwise it will initiate a multipart upload, instead of creating a presigned url and the single file upload won't work.
This will return the url that is then used for uploading the file to your bucket.
### Step-By-Step Instructions
If you want to upload a file from your own application, you can do so by simply sending a put request to the presigend url you receive from the [File Storage Action](/actions/native-action/file-storage) via [Upload Url](/actions/native-action/file-storage#upload-url). The file needs to be set as request *body* and a *Content-Type* header with the respective file type needs to be set as well.
1. **Get the File**:\
The example below uses a simple HTML file input element.\
Example: `const file = document.getElementById('fileInput').files[0]`
2. **Send a PUT request with the File to the presigned URL**:\
The example below uses the fetch API, but you can use any other method to send the request, such as Axios or XMLHttpRequest.\
The `url` that the request is sent to, is the url that you receive in the [Create Presigned URL](/file-storage/uploading-files/single-file-upload#create-presigned-url) step.
3. **Error handling**:\
The example below uses a simple check if the response was ok and prints the error message to the console.\
You can adjust this to your needs and add a custom retry logic if needed.
```js theme={null}
const file = document.getElementById(`fileInput`).files[0]
const presignedUrl = 'https://upload.fastgen-storage.com/9TmH79S/I4ayRTrNmufsGKNldMRMaokoCt+Jm3kXrxgzKgXX5gJ1uwn7zEocR1ZPSjbZtHJp8PCWQ58U5EM87gA4/44depTrwxiGoFBIufVoExuCtZ9TJcYGW6cv/u+uagvEbOQaWz3AfPVjPkcnKtqKw4PPRi9tvnC7ktb88apfBEqUOana/H+zZeYX+s7vKrI9TVwkNj7fKkVYCw+bwazrBO8Et1mDUxHncOAd67bYJ4IvPbnxhD2+efyFCMd3sokgkPETCJOEEQ7M6ilu3281P9gPAmqBt+vK9foH2bUTzdU1NDjwCNXiWDKsFOyLLTTJJaT9ULOJUHcY0cQBJCc6hAClsWQ3++01eAqZMnPUW1Acja2nxf721/dj8Zx42WNiEKQ42YXJbO3dDzTkEoyT/zav6rwuVmSKMIASmvCgOT+8wV9G2uGF376U1K/5ojWxUubRW4jyhjftOUc/UfOkBSMGOHsAHf8R1d7Zn/StiU3f5gRbIxh4a/oFDb6alwp4DeO0vPnRqxm19s3bvo3oWv4wDAOeoUg94jEzxrVjHAeuaeLihvLXhqXWnec0vdDYV39STUepZc+KMW5K4OjN1RzI9SIk87ZqdtywAvK3cw4K6Ub29pjtY/bRTVbDPp1A0TE8XXTe+mQtezNce0DhMwBT4r4C26jfAsLOu2KkIFhtUAqYUf9Ny4KQpOJCOMXo+JrkI77Ni2AcTmoipTjo7JoMji0p01Qh7qBu1pCNQrv1Bn91VNm3A3ByZabtly2meatzT2cNinW2V0fuIu/gR0BmP9XhhjMU6ALchiY='
function uploadFile(presignedUrl, file) {
try {
const response = await fetch(presignedUrl, {
method: 'PUT',
body: file,
headers: {
'Content-Type': file.type,
},
});
if (response.ok) {
console.log('File uploaded successfully');
} else {
console.error('Failed to upload file', response.statusText);
}
} catch (error) {
console.error('Error uploading file', error);
}
}
```
## Uploading programmatically
### Create Presigned URL
In order to upload a file programmatically, you need to have a presigned URL. A presigned URL is a URL that grants temporary access to a specific resource in a storage service, allowing users to upload or download a file without needing direct access to the service's credentials.
You can create a presigned using the [File Storage Action](/actions/native-action/file-storage) via the [Upload Url](/actions/native-action/file-storage#upload-url).
The `Upload type` needs to be set to `Single file upload`, otherwise it will initiate a multipart upload, instead of creating a presigned url and the single file upload won't work.
This will return the url that is then used for uploading the file to your bucket.
### Step-By-Step Instructions
If you want to upload a file from your own application, you can do so by simply sending a put request to the presigend url you receive from the [File Storage Action](/actions/native-action/file-storage) via [Upload Url](/actions/native-action/file-storage#upload-url). The file needs to be set as request *body* and a *Content-Type* header with the respective file type needs to be set as well.
1. **Get the File**:\
The example below uses a simple HTML file input element.\
Example: `const file = document.getElementById('fileInput').files[0]`
2. **Send a PUT request with the File to the presigned URL**:\
The example below uses the fetch API, but you can use any other method to send the request, such as Axios or XMLHttpRequest.\
The `url` that the request is sent to, is the url that you receive in the [Create Presigned URL](/file-storage/uploading-files/single-file-upload#create-presigned-url) step.
3. **Error handling**:\
The example below uses a simple check if the response was ok and prints the error message to the console.\
You can adjust this to your needs and add a custom retry logic if needed.
```js theme={null}
const file = document.getElementById(`fileInput`).files[0]
const presignedUrl = 'https://upload.fastgen-storage.com/9TmH79S/I4ayRTrNmufsGKNldMRMaokoCt+Jm3kXrxgzKgXX5gJ1uwn7zEocR1ZPSjbZtHJp8PCWQ58U5EM87gA4/44depTrwxiGoFBIufVoExuCtZ9TJcYGW6cv/u+uagvEbOQaWz3AfPVjPkcnKtqKw4PPRi9tvnC7ktb88apfBEqUOana/H+zZeYX+s7vKrI9TVwkNj7fKkVYCw+bwazrBO8Et1mDUxHncOAd67bYJ4IvPbnxhD2+efyFCMd3sokgkPETCJOEEQ7M6ilu3281P9gPAmqBt+vK9foH2bUTzdU1NDjwCNXiWDKsFOyLLTTJJaT9ULOJUHcY0cQBJCc6hAClsWQ3++01eAqZMnPUW1Acja2nxf721/dj8Zx42WNiEKQ42YXJbO3dDzTkEoyT/zav6rwuVmSKMIASmvCgOT+8wV9G2uGF376U1K/5ojWxUubRW4jyhjftOUc/UfOkBSMGOHsAHf8R1d7Zn/StiU3f5gRbIxh4a/oFDb6alwp4DeO0vPnRqxm19s3bvo3oWv4wDAOeoUg94jEzxrVjHAeuaeLihvLXhqXWnec0vdDYV39STUepZc+KMW5K4OjN1RzI9SIk87ZqdtywAvK3cw4K6Ub29pjtY/bRTVbDPp1A0TE8XXTe+mQtezNce0DhMwBT4r4C26jfAsLOu2KkIFhtUAqYUf9Ny4KQpOJCOMXo+JrkI77Ni2AcTmoipTjo7JoMji0p01Qh7qBu1pCNQrv1Bn91VNm3A3ByZabtly2meatzT2cNinW2V0fuIu/gR0BmP9XhhjMU6ALchiY='
function uploadFile(presignedUrl, file) {
try {
const response = await fetch(presignedUrl, {
method: 'PUT',
body: file,
headers: {
'Content-Type': file.type,
},
});
if (response.ok) {
console.log('File uploaded successfully');
} else {
console.error('Failed to upload file', response.statusText);
}
} catch (error) {
console.error('Error uploading file', error);
}
}
```