> ## Documentation Index
> Fetch the complete documentation index at: https://docs.fastgen.com/llms.txt
> Use this file to discover all available pages before exploring further.
# Create first API route
**Create, test and deploy your first API route.**
 ## Overview
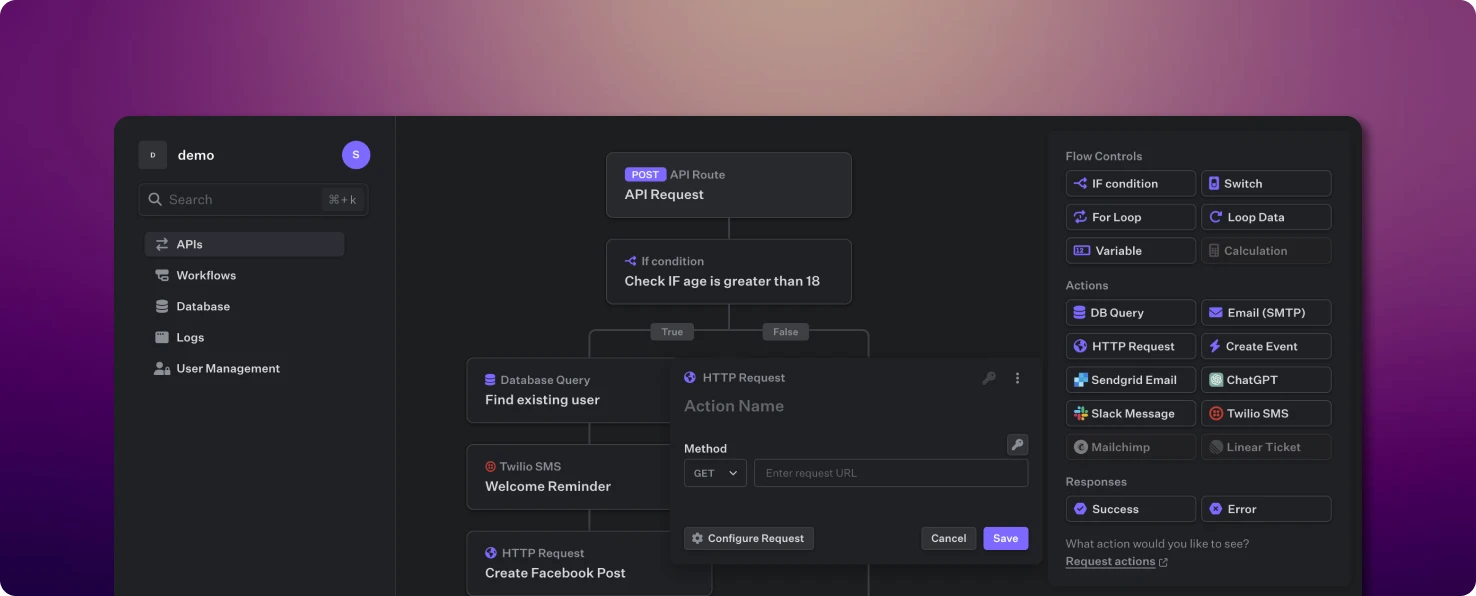
The API builder is the heart of the Fastgen platform and enables you to quickly create any kind of REST API. For each endpoint you can configure unqiue Authentication and Validation rules.
### Action Panel
You build your APIs through a drag and drop action panel which provides you with:
[Flow Controls](/actions/flow-control) give the API structure and specify what it should execute depending on the data that is received.
[Native Actions](/actions/native-action) are execution blocks which let you query a DB, inject custom code or call any other API via an HTTP request.
[Integrations](/actions/integrations) let you interact with popular third party services like Slack, Stripe, Sendgrid or ChatGPT.
[Responses](/actions/responses) let you return success or error status codes and display a JSON message.
### Let's build an API
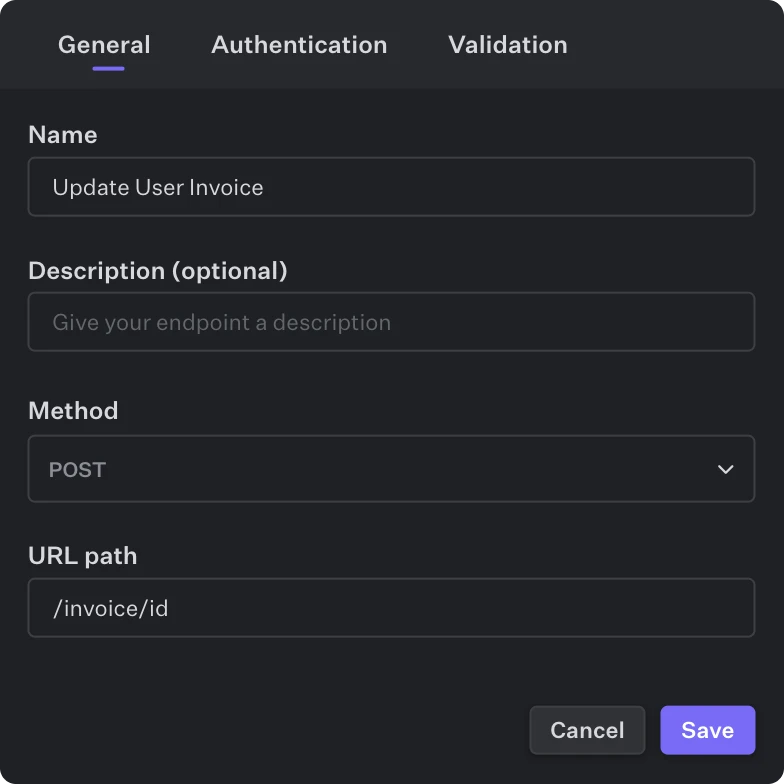
Select *APIs* in the left sidebar and click the *Add route* button.
From here, you can specify the HTTP method and choose from *GET*, *Create (POST)*, *Update (PATCH)* or *DELETE*.
Each API starts with the Top Action, which lets you specify the settings and modifications of the specific endpoint you are about to create.
Besides name and URL path, you can specify [Authentication](/api-routes/authentication) and [Body Validation](/api-routes/validation) for this endpoint:
## Overview
The API builder is the heart of the Fastgen platform and enables you to quickly create any kind of REST API. For each endpoint you can configure unqiue Authentication and Validation rules.
### Action Panel
You build your APIs through a drag and drop action panel which provides you with:
[Flow Controls](/actions/flow-control) give the API structure and specify what it should execute depending on the data that is received.
[Native Actions](/actions/native-action) are execution blocks which let you query a DB, inject custom code or call any other API via an HTTP request.
[Integrations](/actions/integrations) let you interact with popular third party services like Slack, Stripe, Sendgrid or ChatGPT.
[Responses](/actions/responses) let you return success or error status codes and display a JSON message.
### Let's build an API
Select *APIs* in the left sidebar and click the *Add route* button.
From here, you can specify the HTTP method and choose from *GET*, *Create (POST)*, *Update (PATCH)* or *DELETE*.
Each API starts with the Top Action, which lets you specify the settings and modifications of the specific endpoint you are about to create.
Besides name and URL path, you can specify [Authentication](/api-routes/authentication) and [Body Validation](/api-routes/validation) for this endpoint:
 From here on you continue to build out your endpoint with the drag and drop action blocks. APIs can differ vastly in length and complexity. Some powerful APIs will onyl require a handful of actions while other processes require some more logic. Ultimately the API builder is a playground with lots of flexibility.
Use the [Debug Mode](/developer-tools/debug) to directly send test requests to see if the API is executing what you want it to.
Each execution of a test request will be visualized and stored for you to quickly understand which actions were executed and which weren't.
You can modify the Body & Header data, as well as the Authentication & URL parameters for each test request.
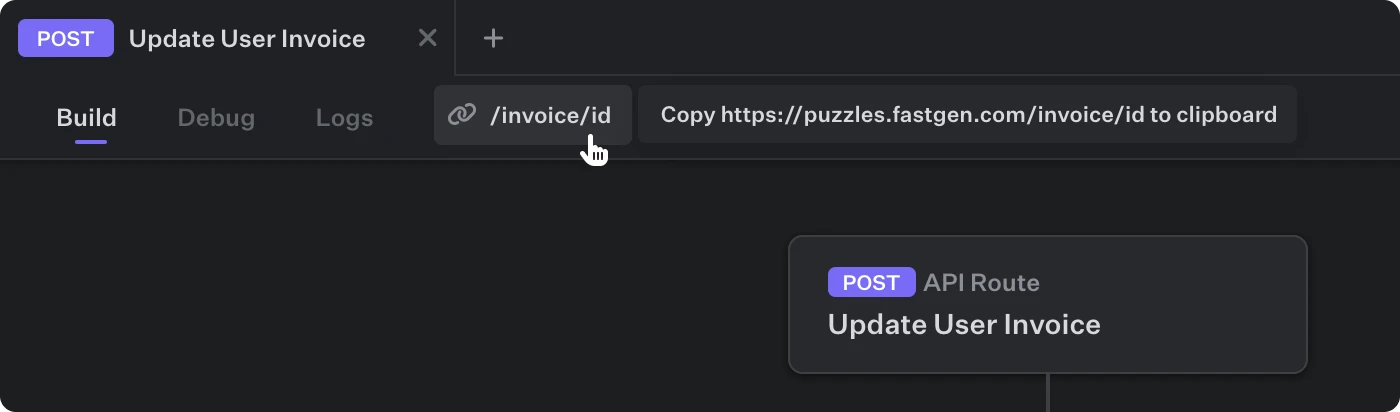
Deploy your routes with one click at the bottom right corner. The API will instantly be live and hosted by us. You can find and copy paste the URL at the top of the route:
From here on you continue to build out your endpoint with the drag and drop action blocks. APIs can differ vastly in length and complexity. Some powerful APIs will onyl require a handful of actions while other processes require some more logic. Ultimately the API builder is a playground with lots of flexibility.
Use the [Debug Mode](/developer-tools/debug) to directly send test requests to see if the API is executing what you want it to.
Each execution of a test request will be visualized and stored for you to quickly understand which actions were executed and which weren't.
You can modify the Body & Header data, as well as the Authentication & URL parameters for each test request.
Deploy your routes with one click at the bottom right corner. The API will instantly be live and hosted by us. You can find and copy paste the URL at the top of the route:
 For a step-by-step example watch this [University Guide](/university/step-by-step/api).
### Body Validation
Body Validation is useful for ensuring that data transmitted in API requests adheres to specific criteria. By validating the request body, you can maintain the integrity and security of your API and safeguard it against invalid or malicious data.
The `Validation` tab, located at the topmost action in a route, enables you to validate JSON data within incoming API requests. If the body of the request fails to align with the specified validation schema, the request will be immediately terminated.
#### General structure
The schema is defined using JSON syntax, with each key corresponding to a JSON key in the request body.
Each value in the schema must be an object that includes, at a minimum, the type key, which can be one of the following: number, string, list, or object. Various keys are available for data validation, depending on the chosen type.
#### Numbers
To validate numerical values, use the `number` data type. The `required` key in the validation schema specifies whether a particular field is mandatory or optional and `required` can be set for all data types:
```json theme={null}
{
"myNumericProp": {
"type": "number",
"required": true
}
}
```
#### Text
To validate text values, use the `string` data type. You can specify additional validation rules, such as a regular expression pattern or minimum and maximum length constraints:
```json theme={null}
{
"myStringProp": {
"type": "string",
"required": true,
"regex": "^[a-zA-Z0-9]+$",
"minLength": 3,
"maxLength": 10
}
}
```
#### Object
To validate text values, use the `object` data type. The `objectValidation` key can then be used to further specify the expected schema for each nested property within the object:
```json theme={null}
{
"myObjectProp": {
"type": "object",
"objectValidation": {
"myNestedProp": {
"type": "string",
"required": true,
"minLength": 1,
"maxLength": 50
}
}
}
}
```
#### List
To validate list values, use the `list` data type. You can specify minimum and maximum length constraints, as well as validation rules for each item within the list:
```json theme={null}
{
"myListProp": {
"type": "list",
"minLength": 1,
"maxLength": 1,
"itemValidation": {
"type": "number"
}
}
}
```
For a step-by-step example watch this [University Guide](/university/step-by-step/api).
### Body Validation
Body Validation is useful for ensuring that data transmitted in API requests adheres to specific criteria. By validating the request body, you can maintain the integrity and security of your API and safeguard it against invalid or malicious data.
The `Validation` tab, located at the topmost action in a route, enables you to validate JSON data within incoming API requests. If the body of the request fails to align with the specified validation schema, the request will be immediately terminated.
#### General structure
The schema is defined using JSON syntax, with each key corresponding to a JSON key in the request body.
Each value in the schema must be an object that includes, at a minimum, the type key, which can be one of the following: number, string, list, or object. Various keys are available for data validation, depending on the chosen type.
#### Numbers
To validate numerical values, use the `number` data type. The `required` key in the validation schema specifies whether a particular field is mandatory or optional and `required` can be set for all data types:
```json theme={null}
{
"myNumericProp": {
"type": "number",
"required": true
}
}
```
#### Text
To validate text values, use the `string` data type. You can specify additional validation rules, such as a regular expression pattern or minimum and maximum length constraints:
```json theme={null}
{
"myStringProp": {
"type": "string",
"required": true,
"regex": "^[a-zA-Z0-9]+$",
"minLength": 3,
"maxLength": 10
}
}
```
#### Object
To validate text values, use the `object` data type. The `objectValidation` key can then be used to further specify the expected schema for each nested property within the object:
```json theme={null}
{
"myObjectProp": {
"type": "object",
"objectValidation": {
"myNestedProp": {
"type": "string",
"required": true,
"minLength": 1,
"maxLength": 50
}
}
}
}
```
#### List
To validate list values, use the `list` data type. You can specify minimum and maximum length constraints, as well as validation rules for each item within the list:
```json theme={null}
{
"myListProp": {
"type": "list",
"minLength": 1,
"maxLength": 1,
"itemValidation": {
"type": "number"
}
}
}
```