> ## Documentation Index
> Fetch the complete documentation index at: https://docs.fastgen.com/llms.txt
> Use this file to discover all available pages before exploring further.
# Event-based
**Run workflows when pre-defined events occur.**
## Overview
Event-based workflows will listen to events you create through the [Create Event Action](/actions/native-action/create-event) in other APIs or workflows and will be executed if these events are emitted. Each event based workflow can listen to one unique event, while multiple different workflows can listen to the same event.
These workflows are an excellent way to modularize your backend processes which will grant you more efficiency when making changes.
## Let's build an event based workflow
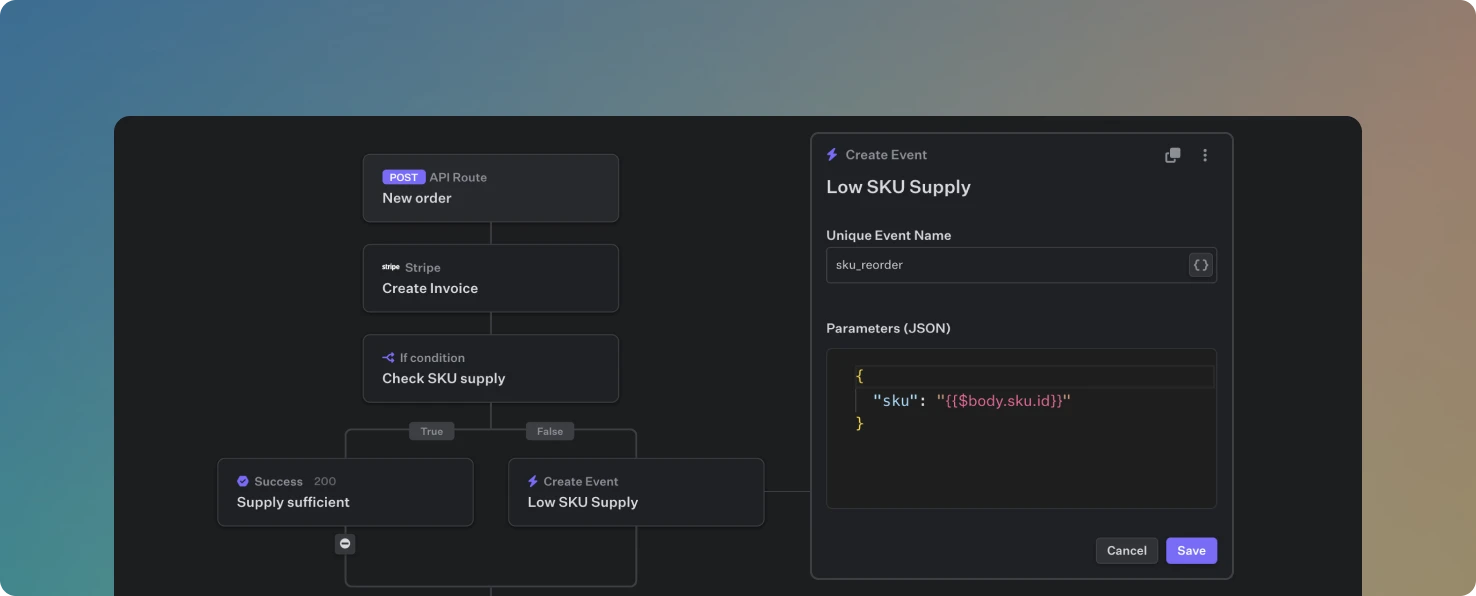
Let’s imagine we have an API endpoint which is called every time a new order is submitted. It will create an invoice, update our warehouse stock and execute a database query to check if the supply of the sold unit is still larger than 50.
Now, if an order is processed and the stock of that product (SKU) drops below the 50 threshold, we are using the [Create Event Action](/actions/native-action/create-event) to emit an event as we want to handle the reorder process with our supplier in a separate, event-based workflow.
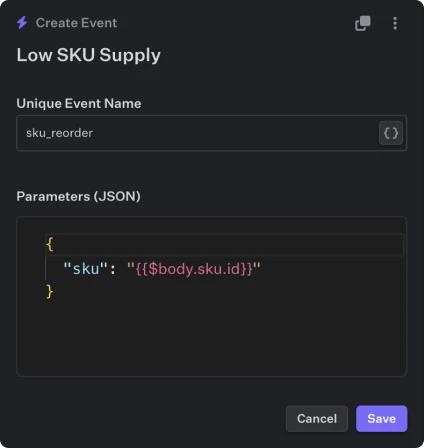
We call the event `sku_reorder` and will store the ID of the SKU of the order `{{$body.sku.id}}` as a parameter. We receive the SKU ID from the body sent to this endpoint and will be able to pass it to our event-based workflow to re-use it there.
Navigate to *Workflows* on the left side bar, click *Add workflow* and choose `Event`.
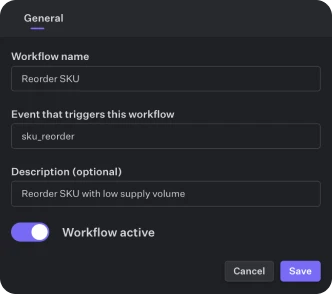
The Top Action lets you specify a name, description and most importantly to which unique event it listens to. The toggle lets you activate and deactivate the workflow. If a workflow is not toggled as active, it won't execute.
Now we can build our supply reorder process and will be able to access the SKU ID at `{{$param.sku}}`.
Similarly to the API Builder, you are able to use the [Debug Mode](/developer-tools/debug) to directly test and debug your workflow. In the top right you can modify the JSON parameters.
Deploy your workflow with one click and it will instantly be live and hosted.
## Video Guide
### Feature Overview
### University Guide
 ## Overview
Event-based workflows will listen to events you create through the [Create Event Action](/actions/native-action/create-event) in other APIs or workflows and will be executed if these events are emitted. Each event based workflow can listen to one unique event, while multiple different workflows can listen to the same event.
These workflows are an excellent way to modularize your backend processes which will grant you more efficiency when making changes.
## Let's build an event based workflow
## Overview
Event-based workflows will listen to events you create through the [Create Event Action](/actions/native-action/create-event) in other APIs or workflows and will be executed if these events are emitted. Each event based workflow can listen to one unique event, while multiple different workflows can listen to the same event.
These workflows are an excellent way to modularize your backend processes which will grant you more efficiency when making changes.
## Let's build an event based workflow
 We call the event `sku_reorder` and will store the ID of the SKU of the order `{{$body.sku.id}}` as a parameter. We receive the SKU ID from the body sent to this endpoint and will be able to pass it to our event-based workflow to re-use it there.
 Now we can build our supply reorder process and will be able to access the SKU ID at `{{$param.sku}}`.