User Management
Fastgen’s User Management feature allows you to seamlessly manage end-user authentication for your projects.- Hosted User Management: Quickly set up and manage end-user authentication with our comprehensive user management hub.
- Built-in Authentication Endpoints: Utilize built-in API endpoints for user account management, two-factor authentication setup, password resets, and more, ensuring secure access to your application.
For specific user actions such as creating, updating, or managing user roles within your workflow or API, please refer to our User Action page. This page focuses on direct interactions with individual user accounts, complementing the broader capabilities featured here in the User Management Hub.
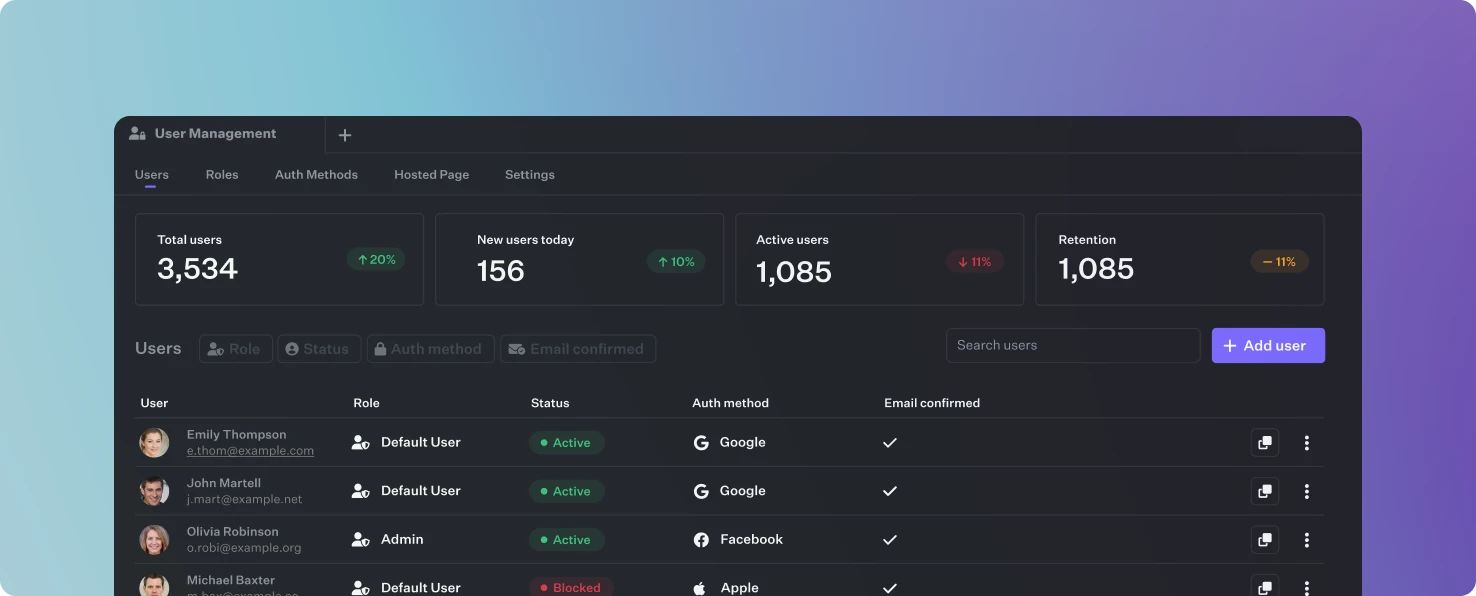
User list view
The list view shows all your endusers while providing you with a key functionalities for user-related actions. You are able to filter, create or update user profiles, block, unblock or delete user access as needed. Additionally you can reset user passwords and initiate email verification processesFastgen-hosted Authentication pages
While we also provide direct API access to create and manage your users, the hosted authentication pages provides you with a batteries-included, secure and customizablelogin, signup, and password reset interfaces for your users. You can redirect users to these pages to facilitate these actions.
Custom Domains
Additionally, you have the option to access our hosted authentication pages using a custom domain. By simply pointing theCNAME (Canonical Name) record of your domain’s DNS settings to ‘cname.fastgen.com,’ you can integrate our authentication pages into your own domain. This functionality not only allows you to maintain a consistent branding experience while leveraging the power of our authentication services but also allows for cookie based user sessions.
It’s worth noting that while the setup process is quick and straightforward, it may take a few minutes for the SSL certificate to be generated and the secure HTTPS connection to be established.
Workflow trigger
For extra control and automation, you can combine Fastgen workflows with specific authentication events. This lets you send email verification messages through your preferred email service provider or track user signups and logins programmatically. You can register workflows onto the following triggers: The workflow triggersEmail Verification request, Password reset request and Email change request all provide the redirect url through the event payload. Send this url via an email to the user to let him click on it and the user will be redirected back over the hosted auth pages (if enabled) to complete the password reset / email verification / email change process.
To find more about these events and their payload head to the Auth System Events Documentation
Connecting third-party auth providers
Google
Callback URL for GoogleThis is the URL Google will redirect to after successful authentication. You’ll need to provide this in your Google Cloud Console.In the Google Cloud Console, go to the Credentials page, edit your OAuth 2.0 client IDs, and add the Callback URL in the “Authorized redirect URIs” section.Client IDThe Client ID identifies your application to Google’s OAuth 2.0 server. You can find or create a new Client ID in the Credentials section of the Google Cloud Console. Select “Create credentials” and choose “OAuth client ID” to generate this.Client SecretThe Client Secret is a password for your application to authenticate with Google’s servers.
After creating your OAuth client ID, the Client Secret will be shown to you.
Google Workspaces
Google Workspaces
Callback URL for Google WorkspacesThis is the URL that Google will use to redirect users after they authenticate. You’ll add this to your Google Cloud Console for the OAuth consent screen and credentials.
Go to the Google Cloud Console, select the project associated with your Workspaces, and under “Credentials,” add this URL to the “Authorized redirect URIs” for the OAuth 2.0 client IDs.Client IDIn the Google Cloud Console under “Credentials,” create a new OAuth 2.0 client ID or use an existing one to get this ID.Client SecretYou can find or create a Client Secret in the same “Credentials” section where you got your Client ID.Organization Domain (Optional)If you want to restrict authentication to users from a specific Google Workspace domain, you can specify the domain here.
This field is optional, but if you choose to use it, enter your organization’s domain (like “yourcompany.com”).
Github
Github
Callback URL for GithubYou’ll need to provide the Callback URL that GitHub will redirect to after authentication. This URL needs to be added to your GitHub OAuth application settings.
To add this, go to your GitHub account settings, navigate to “Developer settings,” then to “OAuth Apps,” and either create a new application or select an existing one to add your Callback URL.Client IDThe Client ID is a unique identifier for your GitHub OAuth application.
Once you’ve registered your application in GitHub, you’ll be provided with a Client ID. You can find it in the settings of the OAuth application you just created or modified.Client SecretAfter registering your application, GitHub will generate a Client Secret for you. It can be found in the same OAuth application settings where you got your Client ID. Be sure to record it securely and not expose it publicly.
Facebook
Callback URL for FacebookThis URL is where Facebook will redirect users after they authenticate. You need to include this in your Facebook app settings.
Go to the Facebook for Developers website, select your app, then under ‘Facebook Login’ settings, add this Callback URL to the ‘Valid OAuth Redirect URIs’ field.Client IDThe Client ID, also known as the App ID on Facebook, identifies your application.
Find the Client ID in the ‘Dashboard’ section of your app’s settings on the Facebook for Developers site.Client SecretYou can find the Client Secret in the ‘Settings’ > ‘Basic’ section of your app on the Facebook for Developers site. You may need to click ‘Show’ and enter your password to view it.
Apple
Apple
Callback URL for AppleThis URL is where Apple will send users after they have authenticated. Add this URL to your Sign in with Apple configuration.
To set this up, visit your Apple Developer account, go to the “Certificates, Identifiers & Profiles” section, and add the Callback URL in the respective field for your App ID or Service ID.Client IdThis will be the Service ID you create in the Apple Developer portal under “Identifiers”.Team IdThe Team ID is a 10-character identifier assigned to your Apple Developer Program team.
You can find your Team ID in the Membership section of your Apple Developer account.Key IdThe Key ID is associated with the private key for Sign in with Apple.
You generate this in the “Keys” section of the Apple Developer portal and associate it with your Sign in with Apple feature.Private KeyThis is the actual private key you download when you create a Sign in with Apple key in the Apple Developer portal.
Discord
Discord
Callback URL for DiscordThis is the URL to which Discord will redirect after a user has authenticated. You need to specify this URL in your Discord application settings.Go to the Discord Developer Portal, select your application, and then enter this URL in the “OAuth2” page under “Redirects”.Client IDYou can find your Client ID in the “General Information” page of your application settings in the Discord Developer Portal.Client SecretYou can obtain the Client Secret from the “OAuth2” page in your application settings. Click on “Reveal” to show your Client Secret, and be sure to keep it confidential.
LinkedIn
Callback URL for LinkedinThis URL is where LinkedIn will redirect users after they have authenticated. You need to specify this URL in your LinkedIn application settings.
Go to the LinkedIn Developer Portal, select your application, and then add this URL in the “OAuth 2.0 settings” under “Authorized redirect URLs”.Client IDThe Client ID is a public identifier for your application on LinkedIn.
You can find the Client ID in your application’s details in the LinkedIn Developer Portal.Client SecretYou can obtain the Client Secret from the same application details page where you found the Client ID in the LinkedIn Developer Portal. Be sure to keep this key confidential.
X (Twitter)
X (Twitter)
Callback URL for TwitterYou need to provide the Callback URL that X/Twitter will redirect to after user authentication. This should be added to your Twitter application settings. To add or update the Callback URL, go to the X/Twitter Developer Portal, access your application settings, and look for the “Callback URLs” section under the app details.Client IDFind your Client ID in the “Keys and tokens” section of your application settings on the X/Twitter Developer Portal.Client SecretAccess the “Keys and tokens” section of your application settings on the X/Twitter Developer Portal to find your Client Secret.
Active Directory
Active Directory
Callback URL for Active DirectoryThis is the URL to which Active Directory will redirect users after they have been authenticated.
You will need to configure a Reply URL (also known as the Sign-On URL) in their Azure Active Directory application settings.Client IDThis is the unique identifier for your application that is registered with Active Directory.
You can find this in the Azure portal under Azure Active Directory > App registrations. Select your application to find the Application (client) ID.Client SecretYou can create a new client secret in the Certificates & secrets section of your app registration in the Azure portal.OIDC Discovery EndpointObtain the discovery endpoint from this location: Your application > Overview > Endpoints > OpenID Connect Metadata Document.
Okta
Okta
Callback URL for OktaThe Callback URL is where Okta will send the user after a successful sign-in. This should match one of the URIs you provide when setting up the Okta application.
You can typically find or set the Callback URL in the “General Settings” of their Okta application.Client IDThe Client ID is a public identifier for the application that is obtained from Okta when you register your application.
You will find the Client ID in the “Client Credentials” section when they create or edit an application in their Okta Developer Console.Client SecretJust like the Client ID, the Client Secret is available in the “Client Credentials” section of the application settings in the Okta Developer Console.OIDC Discovery EndpointYou can find the OIDC Discovery Endpoint URL in the Okta Developer Documentation or within their Okta Developer Console under the “Authorization Servers” section.
Bitbucket
Bitbucket
Callback URL for BitbucketThis URL is where Bitbucket will redirect users after they have successfully authenticated. You should add this URL to your Bitbucket OAuth consumer settings.
To set this up, navigate to Bitbucket settings, find the OAuth section under “Access Management”, and then add this URL to the consumer.Client IDYou will find the Client ID in the OAuth consumer settings after they registering your Fastgen application with Bitbucket.Client SecretThis will be provided when when they registering an OAuth consumer in your Bitbucket account settings.
Gitlab
Gitlab
Callback URL for GitLabThe Callback URL is the link to which GitLab will redirect after successful authentication. This URL must be provided in the application settings on your GitLab account.
You can typically find or set this in the “Applications” section of your GitLab profile settings.Client IDThis is a unique identifier for the application that is obtained from GitLab when you register your application.
To get a Client ID, register a new application in GitLab under “User Settings” > “Applications” and provide the necessary details such as the application name and the Callback URL.Client SecretIt is provided by GitLab once the application is registered, and you should ensure it is kept secure.OIDC Discovery EndpointGitLab provides this endpoint, and users can find it in their GitLab OpenID Connect provider documentation.
SAML by BoxHQ
SAML by BoxHQ
TBD
Authentication API
We provide a suite of API routes specifically designed for authentication purposes. These routes cover everything from user sign-up to session management.- Email-based Sign Up/In: Enable users to sign up or sign in using their email addresses.
- Email Verification: Verify user email addresses as part of the authentication process.
- Session Renewal: Manage and renew user sessions to maintain continuous authentication.
- User Identity: Retrieve user identity information.
- Logout: Allow users to securely log out of the application.
Fastgen’s authentication capabilities are designed to provide maximum security while offering flexibility to suit various project requirements. Explore our subpages for detailed documentation on each aspect of authentication within Fastgen.